A SHORT INTRODUCTION TO AUTOCAD
Welcome to the world of CAD - In this tutorial you will be learning the basics of CAD. The course is designed so that the commands and instructions should work on almost any version of AutoCAD, although this version is designed specifically for AutoCAD 2010 and will work great for 2012. By the end of this level you will have the skills to develop basic 2D drawings and print them out to scale. For an introduction to what CAD is all about, check out my Blog post.
Let's start at the beginning, these things you need to know, or the rest of it won't make any sense at all. Make sure you have a very good understanding of this lesson before continuing. This lesson is longer than most, but will cover important topics. Learn it, live it.
The X,Y coordinate system
Everything that you draw in AutoCAD is exact. It will be more accurate than you will ever need it to be. We're talking 14 decimal points accurate. All objects drawn on the screen are placed there based on a simple X,Y coordinate system. In AutoCAD this is known as theWorld Coordinate System (WCS). You must understand this to know how to put things where you want them. (3-D work has an added axis, the Z-axis, but this is not covered in this lesson.) Below is a diagram showing you how this system works.
In order to work effectively with AutoCAD, you have to work with this system. Until you are comfortable and familiar with it, learning AutoCAD will be more of a chore. My experience in teaching is that the better a student is with coordinates, the better CAD draftsperson they will become.
Here is how it works:
AutoCAD uses points to determine where an object is located. There is an origin where it begins counting from. This point is (0,0). Every object is located in relation to the origin. If you were to draw a line straight out to the right from the origin, this would be considered the positive X-axis. If you were to draw a line straight up, this would be the positive Y-axis. The picture above shows a point located at (9,6). This means that the point is 9 units over in the X-axis and 6 units up in the Y-axis. When you are working with points, X always comes first. The other point shown is (-10,-4). This means that the point is 10 units in the negative X-axis (left) and 4 units in the negative Y-axis (down).
A line has two points, a start point and an end point. AutoCAD works with the points to display the line on the screen. Move your cursor over the picture above and you will see line drawn from the absolute points of (-10,-4) to (9,6).
Most of the time you will not have an indication of where the origin is. You may need to draw a line from the endpoint of an existing line. To do this you use relative points. These work the same way, but you have to add the @ symbol (shift+2) to tell AutoCAD that this next point is relative from the last point entered.
To review:
ABSOLUTE POINTS are exact points on the drawing drawing space.
RELATIVE POINTS are relative to an OBJECT on the drawing space.
ABSOLUTE POINTS are exact points on the drawing drawing space.
RELATIVE POINTS are relative to an OBJECT on the drawing space.
Its a simple system, but mastering it is the key to working with AutoCAD and is explained in more detail further below.
Angular Measurement
AutoCAD measures angles in a particular way also. Look at the diagram below and then place your mouse on it to see how this is done.
When drawing lines at an angle, you have to begin measuring the angle from 0 degrees, which is at the 3 o'clock position. If you drew a line at 90 degrees, it would go straight up. The example above (when you move your mouse over it) shows a line drawn at +300 degrees (270+30), or -60 degrees.
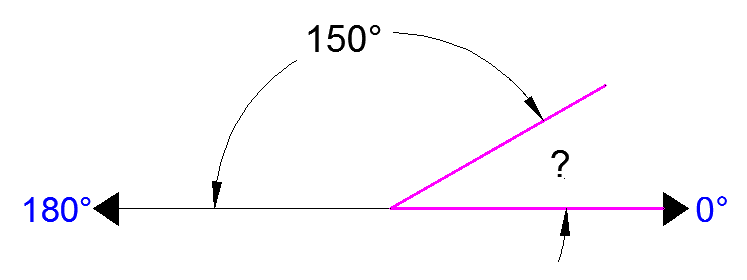
You might not always have an obvious reference point for 0 degrees. Look at the example below and place your mouse on the image to find out the angle in question.

In this example, you are given information about the lines, but not the angle AutoCAD needs to draw the line from the start point. What you are given though, is (a) the knowledge that 0° is at the 3 o'clock position (b) the knowledge that 180° is at the 9 o'clock position and (c) the angle between 180° and the line you want to draw is 150°. With this information, you can figure out what angle you need. Here is a fool-proof way of getting the angle you need:
1.) Start at the 0° position and measure counter-clockwise (+) to 180°.
2.) From 180°, measure clockwise 150° (-)
3.) Consider that you just went +180-150 and use that as an equation: +180-150=30
4.) Now you can draw your line using polar coordinates
Entering Points in AutoCAD
You can enter points directly on the command line using three different systems. The one you use will depend on which is more applicable for the situation. The first assignment will get you used to this. The three systems are as follows:
ABSOLUTE CO-ORDINATES - Using this method, you enter the points as they relate to the origin of the WCS. To enter a point just enter in the exact point as X,Y.
RELATIVE CO-ORDINATES - This allows you to enter points in relation to the first point you have entered. After you've entered one point, the next would be entered as @X,Y. This means that AutoCAD will draw a line from the first point to another point X units over and Y units up relative to the previous point.
POLAR CO-ORDINATES - You would use this system if you know that you want to draw a line a certain distance at a particular angle. You would enter this as @D<A. In this case, D is the distance and A is the angle. Example: @10<90 will draw a line 10 units straight up from the first point.
The three ways of entering coordinates shown above are the ONLY way AutoCAD accepts input. First decide which style you need to use, and then enter as shown. Remember that X is always before Y (alphabetical). Don't forget the '@' symbol when you are entering relative points. Any typing error or omission will give you results you don't want. If you make a mistake and need to see what you typed, press F2 to bring up the text screen and check your typing.
The AutoCAD Screen

Move your cursor around the image above to find the names of various areas of the screen.
- Application Button - This button displays commands for printing, saving, drawing utilities and other non-drawing tool.
- Quick Access Toolbar - This is for quick access to common commands like New, Open, Save, Plot
- Filename - The name of the current file you are working on.
- Search Bar - Search for text in your drawing or search the help files.
- Ribbon - The Ribbon has most of the commands/tools that you will use while you are working.
- Tabs - A series of Tabs make up the Ribbon (Home, Insert, Manage, etc) and organize the Tools into common groups.
- Panels - Contain a group of tools
- Tools - These are the icon that start the commands you use to draw, modify, etc.
- Tool Tip - If you hover your mouse over a tool, a tool tip will appear to give your more information. Hold it longer for more info.
- Drawing Space - These is where you draw your designs.
- Command line - When you type a command, you will see it here. AutoCAD uses this space to 'prompt' you for information. It will give you a lot of information and tell you where you are in the command. Watch this line while learning.
- Status bar - This allows to see and change different modes of drawing such as Ortho, Osnaps, Grid, Otrack, etc. You can right click this area to toggle between icons and text for this area.
Workspaces
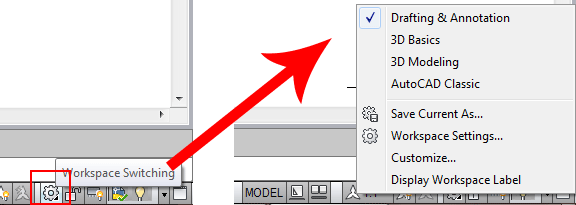
With the introduction of AutoCAD 2009, a new screen layout was added. The program now allows you to work in different workspaces depending upon what you are working on. For example, the screen will look different if you are working on 2D than it will with 3D work. There is also an option for AutoCAD Classic (which is how the screen looked from Versions 2000-2008). This set of tutorials will deal with the new new workspace. Since you are a new user, you may as well learn the new interface. If you want to use the Classic interface, use the tutorials for AutoCAD 2008.For the first 2 levels of tutorials, you will want to be in the 2D Drafting & Annotation workspace. Set this by clicking in the bottom right of the AutoCAD screen on the 'gear' icon as shown in the image below. In AutoCAD 2012, this is at the top of the screen.
Icons, Keystrokes and Menus
There are many ways to do things in most Windows programs. AutoCAD is no exception. Everyone will develop a way that works best for him or her. In this course, we will primarily be working with the keystroke commands. The reason for this is because they will work in most AutoCAD versions (including DOS versions), and in some other CAD programs. The icons work well, but as you will see, icons can be placed anywhere on the screen and can be difficult to find quickly. You may be working on another employee's computer that is set up differently than than what you're used to. The pull-down menus will access almost all commands, but are a slower way of doing things. Icons in AutoCAD 2010 are found on the ribbon, divided into panels - just click on the appropriate tab to open the panel you need..Example: If you want to draw a line, you can do it a few ways:- At the command line type: LINE (or) L and press the ENTER key.
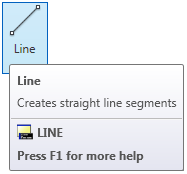
- Select the line icon from the DRAW Panel..

All three approaches will do the same thing: prepare AutoCAD to draw a line where you tell it.(THE ABOVE FLASH IS WORK JUST YOU INSTALL FLASH PLAYER)
AutoCAD is a popular program because it can be customized to suit an individual's needs. The toolbars are a good example of this. You can have the toolbars you use most often on the screen all the time. You can easily make them go away so that you have more drawing space. You can also customize them so you have the most common commands on one toolbar. For example, the dimensioning toolbar is one that you will not want taking up space on your screen while drawing, but is very handy when you're dimensioning your drawing. To remove the ribbon and have the most drawing space available, click on the "Clean Screen" icon in the bottom right corner of the screen. To go back the to the standard display, click again on the same icon.


No comments:
Post a Comment